


Want to create a Divi Child theme for your WordPress website? Then you’ve come to the right place. Step by step I will guide you through the process. If you don’t feel like creating the child theme yourself, you can also download our free Divi Child Theme. You will find the download link further down in the text.
You do not have to watch the video if you do not want to. You will find all information in this post as well.
Directions: Create Divi Child Theme
So, let’s get down to business. Now how do I create a child theme for Divi? The child theme consists of two main files. The strong functions.php and the strong style.css. We need to create both files. We don’t need much for that, just a computer with a simple word processor. Alternatively, you can download our free Divi Child Theme to install it directly on your WordPress website.
Step 1: Create folder
The first thing you should do is to create a folder on the desktop. In this folder the files you created for the Child Themes will be placed. You can name the folder basically as you like. For our tutorials we simply name it “DiviChild>/strong>”.
Step 2: create functions.php
In the second step we create the functions.php file. To do this, open a simple word processing program on your computer. If you work with a Mac, you can use TextEdit . Windows users can use the Notepad text editor. Both programs should be pre-installed on the respective operating system.
Insert the following code into the text file of functions.php:
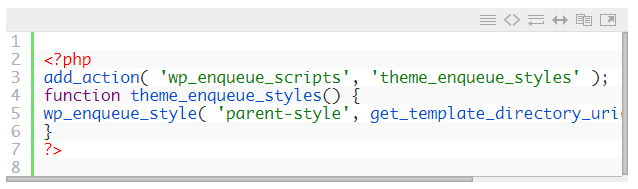
add_action( ‘wp_enqueue_scripts’, ‘theme_enqueue_styles’ ); function theme_enqueue_styles() { wp_enqueue_style( ‘parent-style’, get_template_directory_uri() . ‘/style.css’ ); }
Then save the file under the file name functions.php in the folder you created before.
Step 3: create style.css
Now open another text document and insert the following code:
/*
Theme Name: DiviChild
Theme URI: http://elegantthemes.com
Description: A Child Theme built for Divi
Author: wplo - WordPress und Divi Theme Tutorials
Author URI: https://www.wplo.de
Template: Divi
Version: 1.0.1
*/
/*
CSS-Code nach diesem Kommentar hinter dem abschliessenden Schraegstrich einfuegen
*/
The file is to be saved under the file name style.css in the folder previously created.
Step 4 (optional): Create screenshot
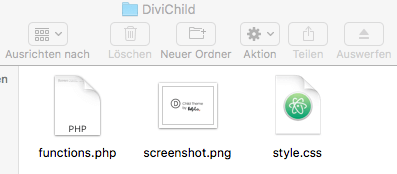
If you want, you can create a screenshot with the dimensions 880 x 660 px and attach it to the folder. The screenshot will then appear as a thumbnail in the WordPress Theme overview. The content of the folder should now look like this:
Step 5: Divi Child Theme Installation
You can now add the child theme to your website via the WordPress Theme Upload or via FTP and activate it. If you decide for the former, just follow the next steps.
Step 5.1: Divi Child Theme Upload
Since WordPress only accepts themes as zip files, we have to compress the folder before uploading. Mac users right-click on the folder and select >strong> “Collapse folder name” off. Windows users also right-click the folder to compress it. Click on the folder and select Send to > Zip compressed folder.
Step 5.2: Login
Now we can log in on our website
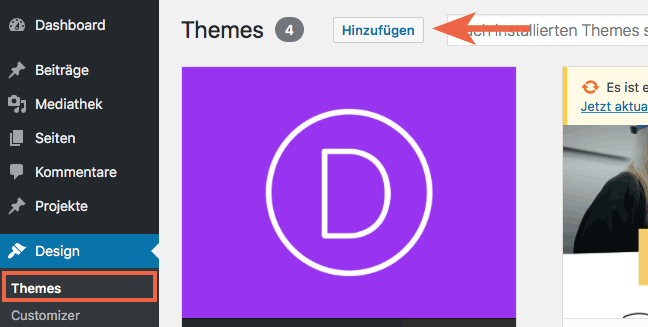
Step 5.3: Add Divi Child Theme
Then we navigate to Design > Themes and click on Add in the upper area
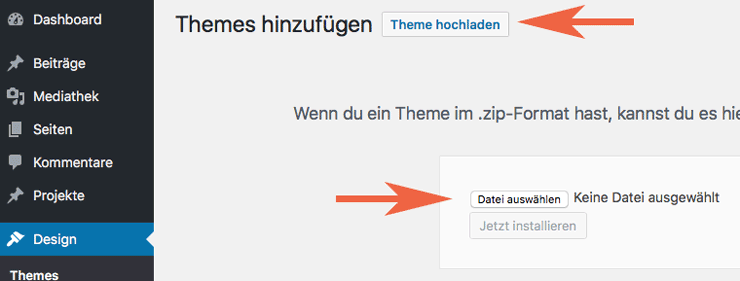
Step 5.4: Upload Divi Child Theme
To upload the Child Theme, click on Upload Theme and select the compressed folder from your computer. If you have done everything correctly, the Install now button will become selectable. Click on the button!
e.g;
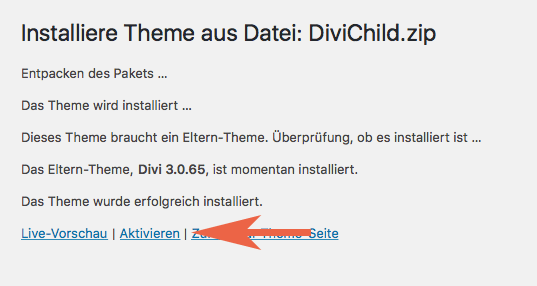
Step 5.5: Activate the theme
If everything went well, you should now receive the message shown below. Now click on Activate to complete the process.
That’s about it. The installation is now complete. Check directly if your WordPress website works as before. You can now make changes without overwriting them during an update. By the way, we have created two more articles that might interest you in this context. One is a guide to correctly editing functions.php and the other, a tutorial on embedding CSS code with Divi. It is important to understand the basics so that the code you include does not cause unwanted damage to your website.
Any questions? Suggestions for improvement or suggestions for further articles? Then use the comment function below this article!


Comments