

WordPress WYSIWYG Entry
First log into your WordPress admin area and click either “Post” or “Page” (depending on what you want to edit) in the menu option on the left. If you would like to add a new post or page instead of editing an existing one, you can first view our Tutorial on Blog Posting.
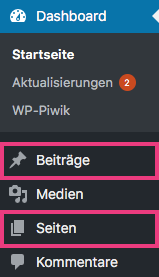
Once you have clicked on the tab in the menu bar, all existing posts and pages on your website will be displayed. To edit the post, you can either click directly on the title or move the mouse pointer over the bottom of the title to see more options. In our case we click on “Edit”.

You will then be taken to the “Edit Post” or “Edit Page” section for the post or page you wish to edit. The text editor is the same whether you are editing a post or a page. Therefore the following information applies to both.
Two editors: Visual editor and text editor
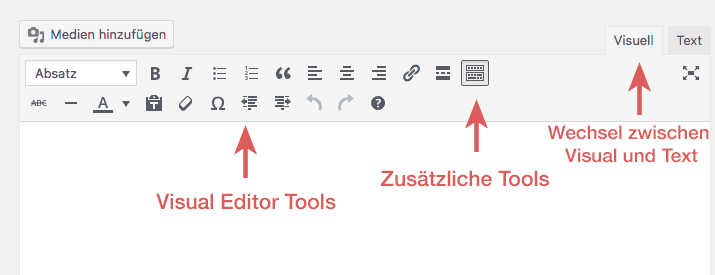
The content editor offers two forms, the editor “Visual” and the editor “Text”. You can switch between the two editors by clicking on the respective tabs in the upper right corner of the content editor. Even if content has already been entered, you can switch without losing the content. The picture below shows the visual editor.
Visual text editor
The visual editor shows your texts and images in a similar way as they appear on your website. I say similar because the font size, color, spacing, etc., depending on which theme you use, could be displayed differently than in the text editor. This means that if you format a text in bold, for example, it will be displayed in bold in the text editor, but on your web page, custom coding bold text can also make it larger or colored, etc. You will already get to know the individual design of your website when you work with it. See below for more information on how to use the visual editor.
The text editor
The text editor displays your text as HTML code. If you type only text, the text editor displays only text. But if you add an image, instead of the actual image, you will see a code indicating where the image is located, how it should be displayed and so on. The code is very specific. If you are not familiar with it, it is better not to use the text editor.
Excursus – copy and paste content correctly
Often it is more convenient to prepare your content in another program like Word and copy and paste the finished version into the editor. If you want to copy and paste text and other content from Word or another word processing program, you may copy and paste code that is not visible at first glance. You should be careful with this, because this additional code may cause unwanted formatting. To avoid formatting later, you should pay attention to the following:
More possibilities for inserting text
- Use a simple text editor: One option is to use a simple text editor to prepare your content on your computer. Simple text editors do not add code to your text. On a Mac, you can use TextEdit to add code. On Windows, Notepad should be preinstalled on your computer.
- Another possibility is to convert the text before copying and pasting in WordPress. For this you write your text as usual in Word or similar and copy and paste it into TextEdit or Notepad. Then copy the text again and paste it into the WordPress text editor using the “Paste as Text” button (see screenshot below).
Using the Visual Editor
To enter text in the visual editor, simply click with the mouse pointer in the white field and start typing – just like in other word processing programs.
If you want to format text in bold or italics, select the word or phrase you want to format and click on the corresponding function button in the toolbar. Some functions are implemented immediately, for others WordPress needs more information. For example, to link to another website, select the desired text, click on the link icon and enter the URL of the desired link in the pop-up window.
For other functions like the bulleted list, it is necessary to click on the button again after you have finished typing to exit the function.
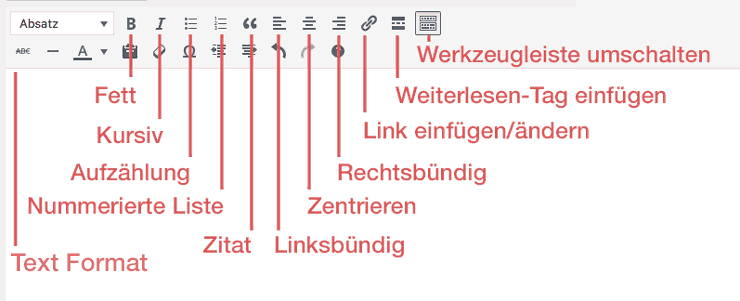
The toolbar
The Visual Editor offers two series of functions. The upper toolbar contains the typical editing functions as well as a button to show or hide the second, lower toolbar. In the screenshot below you can find a quick guide to both toolbars. You do not have to learn them by heart. Just move the mouse pointer over an icon to show its function.
Setting paragraphs
You may have noticed that when you try to enter a paragraph, there is a fairly large space between the lines. If you want to place several rows of text under each other, such as an address, you can use the following command: Shift + Enter.
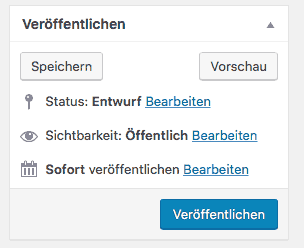
Save draft, preview and publish
Save changes
Even if WordPress saves your work automatically on a regular basis, you can still save your design manually to be on the safe side. Saving a draft means that your content is saved, but your visitors can’t see what you’ve written yet. When you click on the “Publish” button, your content is made available to the public.
Publish options
When you have finished editing your post, you can save or publish it. In the following, I will go into more detail about the publishing options.
-
Save draft
Save draft means that you cache your content without making it available to the public. This way it is possible to work on a contribution, pause work and finish the contribution at a later time.
-
Preview
The preview opens a separate tab and shows your post or page exactly as it would look after publishing. This option is really useful because, as mentioned above, the view in the Visual Editor can differ from the actual view on the website.
-
Publish
When you click the “Publish” button, your article will be published on your website. As long as you don’t use this option, no one will be able to access this post.
-
Publish at a specified time
This option is really helpful for all those who write several articles in a row, but do not want to publish them all at once for strategic reasons. If you would like to publish your post at a later time, just click on “Edit” next to the calendar icon and set your individual time.
That was it ?

Comments