


WordPress is undoubtedly a really great system and if there is anything that bothers me at all, it would be the outdated and inflexible widgets. If you don’t have any CSS knowledge, you will have a hard time adjusting the Footer widgets to fit the rest of the design. In a previous tutorial I showed you what detour you can take with the Divi theme to create a nice footer.
But not everyone uses Divi and that’s why I want to create a separate tutorial which can be done independent of the theme.
Why use footer widgets?
Now you can ask yourself the legitimate question, why should you use the footer widgets at all and not just embed the footer on each page separately?
Well, for one thing, it can be quite tedious if the “footer” has to be re-integrated under every article. Especially when a specification changes. Do you really want to open every page to implement the changes? No thanks ?
On the other hand, the purely technical aspects of this are also not properly solved. Because the page structure of a website is divided into three parts: Header, Body and Footer. When a page is loaded, the same header and footer are always loaded – only the body normally varies.
The fact that always the same footer and header is loaded is extremely clever and sensible. This way, a change in the footer or the menu bar only has to be implemented once and then becomes active on every page.
Customize WordPress Footer widgets
Now let’s take a look at how the whole thing can be implemented. For this purpose I will use the following example as a guideline:

On IcoUpdate I used a three part footer with a gradient as background. At this point you have to say that the possibilities are different for each theme. With the Divi theme you can have 1-4 widget areas, with other themes only 2 or no widget areas at all.
The structure in our example is relatively classic. The title is followed by a divider and then links to subpages that have not found a place in the menu bar and links to social media.
Instructions: Create widget
Now let’s finally see how it works in practice. To do this, we first go to the widget settings via Design > Widget.
On the right side we see how many widgets the theme offers us.
If you use the Divi Theme, you can set the widget layout under Design Modifier > Widgets.
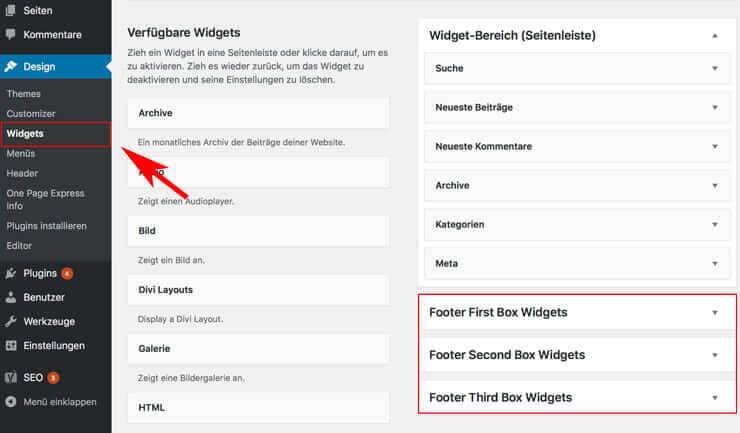
On the left side we see the “available widgets”. That means we can drag one or more of them into the footer area. To recreate our example, I drag and drop a “text widget” into each box.
Then I open the widget and enter the text. You can also load media into the area. It’s almost like the normal WordPress editor, only there are fewer tools to choose from.
Before we save the input, we switch to the tab “Text” and insert the following tag in front of the text:
<hr>
That’s for the dividing line, by the way. If you don’t want to use a divider, you can save yourself the day. Now we still have to save the input. Your footer should now look something like this:

That doesn’t look quite so round yet. I would widen the dividers a bit, adjust the distance and change the background color. This can be done with some CSS code!
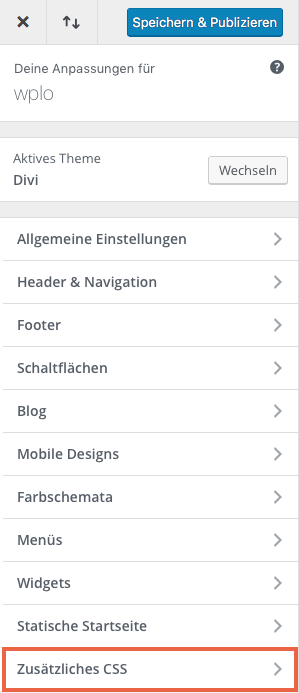
We can include it under Customizer (or design modifier) > additional CSS.
We then insert the following code into the field:
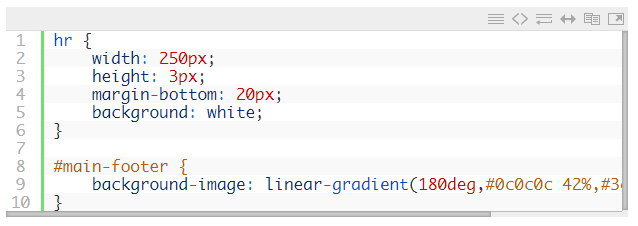
With the first part (hr) we adapt the design to the dividing line.
Width: defines the width of the separator line. In our case I define 250px. You can adjust the width individually, like all other values
Height: stands for the height or thickness of the dividing line
Margin-bottom: defines the distance between the dividing line and the underlying text
Background-color: defines the color of the dividing line
With the second part of the code we determine the background color of the footer. In our case it is a gradient. If you want to have a continuous color, replace the part with the following one:
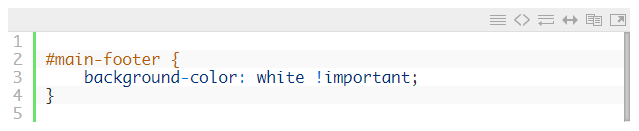
You can replace the “white” with another colour or a colour code.
That’s it!
Any questions?
Suggestions for improvement or suggestions for further articles? Then use the comment function below this post!
We can also do the tutorial for you. Just send an inquiry to adfreak!


Comments